Hello, baking enthusiasts! I’m Jessie, and today, we’re diving into a delightful project that marries artistry with deliciousness: DIY Bumblebee & Flower Cupcakes. These aren’t just cupcakes; they’re edible works of art, perfect for spring celebrations, birthdays, or simply brightening up your day. We’re going beyond simple frosting and diving into fondant work and candy melts, transforming the humble cupcake into a miniature garden buzzing with sweetness. Prepare to elevate your baking game!
Why You’ll Love This Project
These cupcakes are more than just a sweet treat; they’re a creative outlet. Here’s why you’ll fall in love with this project:
- Impressive Presentation: Imagine the look on your guests’ faces when you present these adorable bumblebee and flower cupcakes.
- Customizable Flavors: You’re in control! Choose your favorite cupcake flavor and frosting to create a personalized treat.
- Therapeutic Baking: The process of creating these little masterpieces is incredibly relaxing and rewarding.
- Perfect for All Skill Levels: While they look intricate, these cupcakes are surprisingly easy to make, even for beginner bakers. With a little patience, you can easily pipe beautiful petals.
Ingredients: Your Baker’s Palette
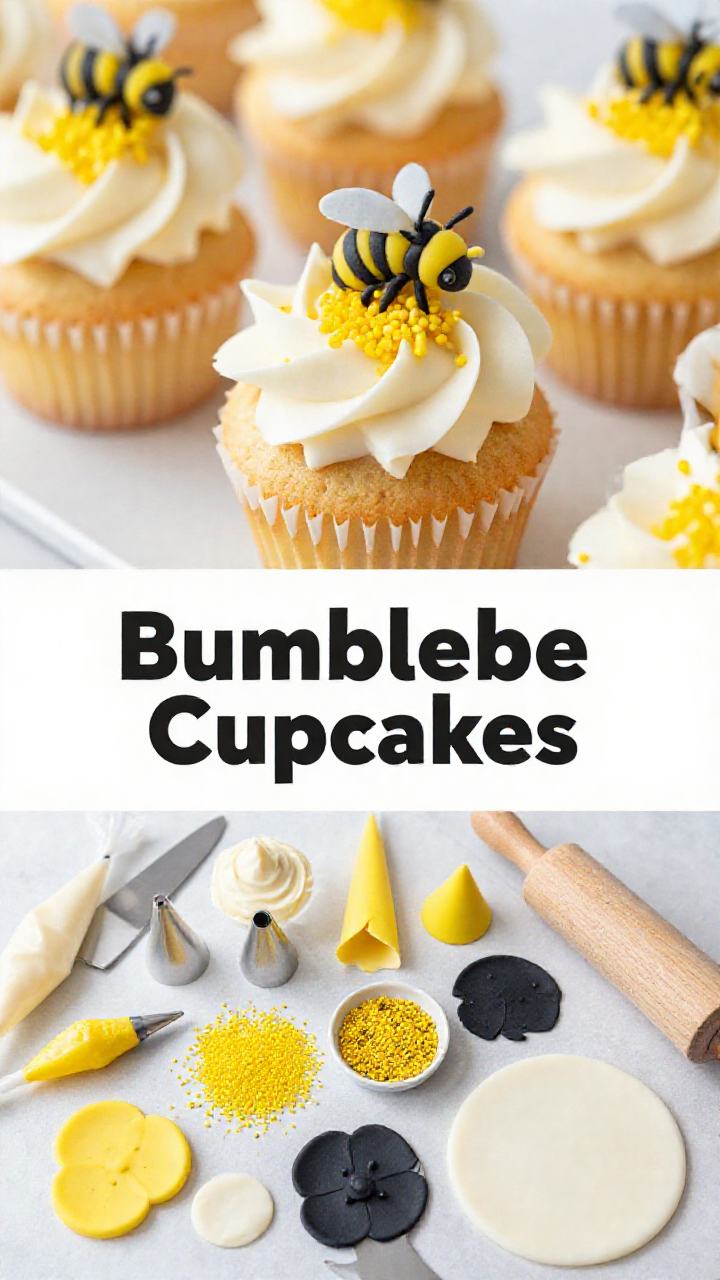
Here’s what you’ll need to bring these bumblebee and flower cupcakes to life:
- Cupcakes: Your favorite recipe or a box mix (any flavor works!). The beauty of this design is that the top of the cupcake will be covered.
- Knife: For leveling the cupcakes.
- White Buttercream Frosting: The canvas for our floral masterpiece. Store-bought frosting can be used, but homemade is recommended.
- Piping Bags: Essential for precise frosting application.
- Round Piping Tip: For creating the frosting base around the edges.
- Petal Piping Tip #104: The key to creating realistic daisy petals.
- Yellow Candy Melts: For the bright and cheerful daisy center.
- Yellow Nonpareils Sprinkles: To add texture and sparkle to the daisy center.
- Yellow Fondant: For crafting the bumblebee’s body.
- Black Fondant: For the bee’s stripes, stinger, and eyes.
- Rolling Pin: To flatten the black fondant for the stripes.
- Pizza Cutter: For precise cutting of the fondant strips.
- White Fondant: For the delicate bee wings.
- Parchment Paper: An essential tool for working with fondant and candy melts.
Let’s Get Baking: Step-by-Step Instructions
Follow these steps to create your own buzz-worthy bumblebee and flower cupcakes:
Step 1: Prepare the Cupcakes
Bake your cupcakes according to your chosen recipe or box mix instructions. Once cooled, use a knife to level the tops if they have a pronounced dome shape. A flat surface will make frosting the flower easier.
Step 2: Prepare the Frosting
While store-bought frosting can work in a pinch, homemade frosting provides superior piping quality. For a stable and delicious frosting, combine 1 cup of butter with 4 cups of confectioner’s sugar. Mix in 1 teaspoon of vanilla and 2 tablespoons of milk, cream, or water at the end. For frosting that holds its shape even in warm weather, substitute half the butter with vegetable shortening. It still tastes yummy, I promise!
Step 3: Frost Around the Edges
Spoon a small amount of frosting into a piping bag fitted with a round piping tip (like tip #12). Apply a circle of frosting around the circumference of the cupcake. This layer acts as a foundation, preventing the petals from drooping.
Step 4: Pipe the Daisy Petals
Fill another piping bag with the remaining buttercream frosting and fit it with petal piping tip #104. This tip has an elongated teardrop shape, perfect for creating realistic petals. Place the piping tip over the cupcake with the wide end at the center. Tilt the tip about 45 degrees to the right (if you’re right-handed). As you squeeze the piping bag, move the tip toward the edge, allowing the frosting to form the left side of the petal.
Return the tip toward the center, squeezing the bag to release more frosting and form the right side of the petal. Overlap the left and right sides to eliminate gaps. Start with six or seven petals spaced evenly around the cupcake, extending them slightly past the frosting circle for support. Practice on parchment paper first to perfect your technique.
Add additional petals between the first set until there are no gaps. Imperfection is your friend here! Petals of varying sizes and shapes add a touch of realism. Don’t be afraid to experiment with the the piping and the amount of pressure you apply to the piping bag.
Step 5: Create the Daisy Center
For the daisy’s round yellow center, use yellow candy melts. Microwave the melts in 20-second intervals, stirring in between, until smooth. If the candy melts become lumpy, add a teaspoon of vegetable shortening to smooth them out. Transfer the melted candy into a piping bag. You won’t need a special piping tip; simply snip off the very end of the bag to create a small opening.
Squeeze dollops of the candy melts onto parchment paper, creating circles between 1/2 and 1 inch in diameter. While the candy is still warm, sprinkle yellow nonpareils on top for added texture. Allow the centers to cool and harden completely, either at room temperature or in the refrigerator. Once hardened, carefully position the yellow candy center in the middle of the petals. If you’re looking to create a more vibrant yellow color, you can add a small amount of yellow food coloring to the candy melts.
Step 6: Form the Bumblebee Body
Roll a piece of yellow fondant between your hands to create a small oval shape, approximately 1 inch long. If you haven’t worked with fondant before, it has a Play-Doh-like consistency and is easy to mold. The key to working with fondant is to keep it pliable. If it becomes too stiff, knead it gently to restore its flexibility.
Step 7: Add the Bee Stripes
Place some black fondant between two sheets of parchment paper and roll it as flat as possible. Use a pizza cutter to cut thin strips, about 1/8-inch thick. These will be the bee’s signature stripes. Accuracy is key here. If you don’t have a pizza cutter, a sharp knife will work, but be sure to keep the lines clean.
Wrap two black fondant strips around the yellow oval, ensuring they don’t completely encircle the bottom, as it won’t be visible. If the fondant is fresh, the pieces should adhere without any added moisture. If not, lightly dab some water between the pieces to help them stick.
Step 8: Attach the Bee Stinger
While not entirely anatomically accurate, the stinger adds a touch of realism to the bumblebee. Shape a small piece of black fondant into a pointy cone and attach it to one end of the bee’s body. Use a small amount of water to adhere it securely.
Step 9: Add the Eyes
Roll tiny balls of black fondant and attach them to the bee’s face. Use a toothpick to gently hold the eye in place while you press it onto the body with your finger. This will ensure the eyes are securely attached and won’t fall off.
Step 10: Attach the Wings
Roll small balls of white fondant, about 1/4-inch in diameter. Place them between two pieces of parchment paper and flatten them into small circles by pressing down with your thumb. Pinch one end of each fondant circle to create a teardrop wing shape.
Attach two wings to the bee’s body just behind the eyes. Again, they should stick without added moisture, but a touch of water can be used if necessary. Fondant can become sticky when manipulated, so if you encounter this issue, allow it to air dry for a few minutes to harden slightly before use.
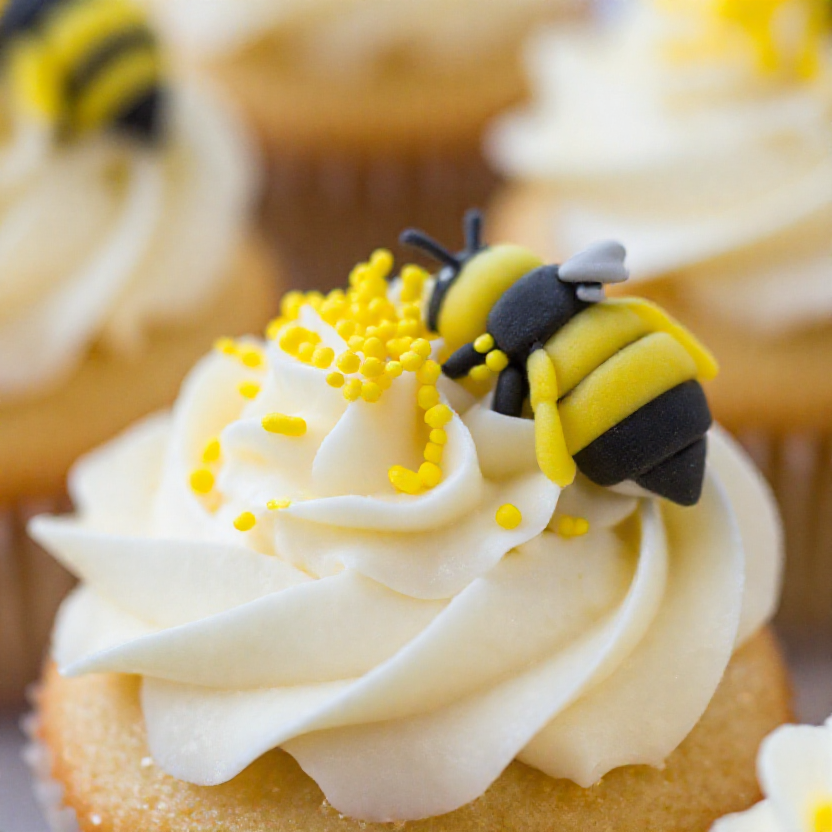
Step 11: Attach the Bee to the Daisy
Position the bumblebee on top of the cupcake, with its head resting on the yellow daisy center. The frosting beneath the bee should hold it in place. If the frosting has hardened or if you plan to transport the cupcakes, secure the bumblebee with a toothpick.
Pro Tips for Perfect Cupcakes
- Room Temperature Ingredients: Ensure your butter and eggs are at room temperature for a smoother batter.
- Don’t Overmix: Overmixing can lead to tough cupcakes. Mix until just combined.
- Cool Completely: Allow cupcakes to cool completely before frosting to prevent melting.
- Practice Piping: Perfect your piping skills on parchment paper before decorating the cupcakes.
- Quality Fondant: Invest in good-quality fondant for easier handling and better results.
Common Mistakes to Avoid
- Overbaking: Overbaked cupcakes will be dry. Check for doneness with a toothpick.
- Too Much Frosting: A thin, even layer of frosting is better than a thick, gloppy one.
- Rushing the Process: Allow ample time for each step, especially cooling and hardening.
- Ignoring Weather Conditions: Adjust your frosting recipe based on the weather to prevent melting.
Variations to Explore
- Different Flowers: Experiment with different petal piping tips to create various flower designs.
- Honey-Infused Cupcakes: Add a touch of honey to your cupcake batter for a subtle sweetness that complements the bee theme.
- Chocolate Bumblebees: Use chocolate fondant for a richer, more decadent bumblebee.
- Edible Glitter: Add a touch of edible glitter to the wings for extra sparkle.
Storage Instructions
Store your decorated cupcakes in an airtight container at room temperature for up to 2-3 days. For longer storage, refrigerate them, but be aware that the frosting may harden.
Frequently Asked Questions (FAQ)
- Can I make these cupcakes ahead of time? Yes, you can bake the cupcakes and make the frosting a day in advance. Store them separately until ready to assemble.
- Can I use store-bought fondant? Yes, but homemade fondant often has a better taste and texture.
- How do I prevent the fondant from drying out? Keep fondant wrapped tightly in plastic wrap when not in use.
- What if my candy melts are too thick? Add a teaspoon of vegetable shortening to thin them out.
Serving Suggestions
These bumblebee and flower cupcakes are perfect for:
- Spring Celebrations: Easter, Mother’s Day, garden parties.
- Birthday Parties: Especially for children who love bees and flowers.
- Baby Showers: A sweet and charming addition to any baby shower spread.
- Everyday Treats: Because sometimes, you just need a little sweetness in your day!
Internal Links
If you enjoyed this recipe, you might also like my other springtime baking tutorials:
Conclusion: A Sweet Symphony of Flavors and Design
There you have it – your guide to creating buzz-worthy DIY bumblebee and flower cupcakes! This project is a beautiful blend of culinary skill and artistic expression. Remember, baking is a journey, not a destination. Embrace the process, experiment with flavors and designs, and most importantly, have fun! Now, go forth and create some edible masterpieces!

DIY Bumblebee & Flower Cupcakes
Ingredients
Method
- Bake cupcakes and flatten tops if needed.
- Prepare buttercream frosting.
- Frost around the edges of the cupcakes.
- Pipe daisy petals using petal tip #104.
- Create the daisy center with yellow candy melts and sprinkles.
- Form the bumblebee body with yellow fondant.
- Add bee stripes with black fondant.
- Attach the bee stinger with black fondant.
- Add the eyes with black fondant.
- Attach the wings with white fondant.
- Attach the bee to the daisy.
Notes