Shamrock Shake Cake Recipe: An Ode to Emerald Flavors
Ah, the Shamrock Shake. Its annual return signals the nearing of St. Patrick’s Day, a vibrant celebration steeped in tradition and, of course, delightful green hues. But what if we could capture that fleeting minty magic and transform it into something even more enduring? I’ve always been captivated by the way flavors can evoke memory, and this Shamrock Shake Cake does just that. It’s more than just a dessert; it’s a culinary memory, a taste of nostalgia, and a beautiful centerpiece for your St. Patrick’s Day celebration.
This recipe isn’t just about following steps; it’s about understanding the lineage of flavors, the dance between ingredients, and the stories that each element brings to the table. I’m excited to share this recipe with you, and I hope it becomes a cherished part of your own family’s traditions. It’s a cake that whispers of springtime, of Irish heritage, and of the simple joy of sharing something delicious with loved ones. The cake itself is tender and moist, infused with the subtle coolness of mint, and adorned with a creamy, dreamy frosting that echoes the classic Shamrock Shake.
Why You’ll Love This Shamrock Shake Cake
- Nostalgic Flavor: Captures the essence of the beloved Shamrock Shake in cake form.
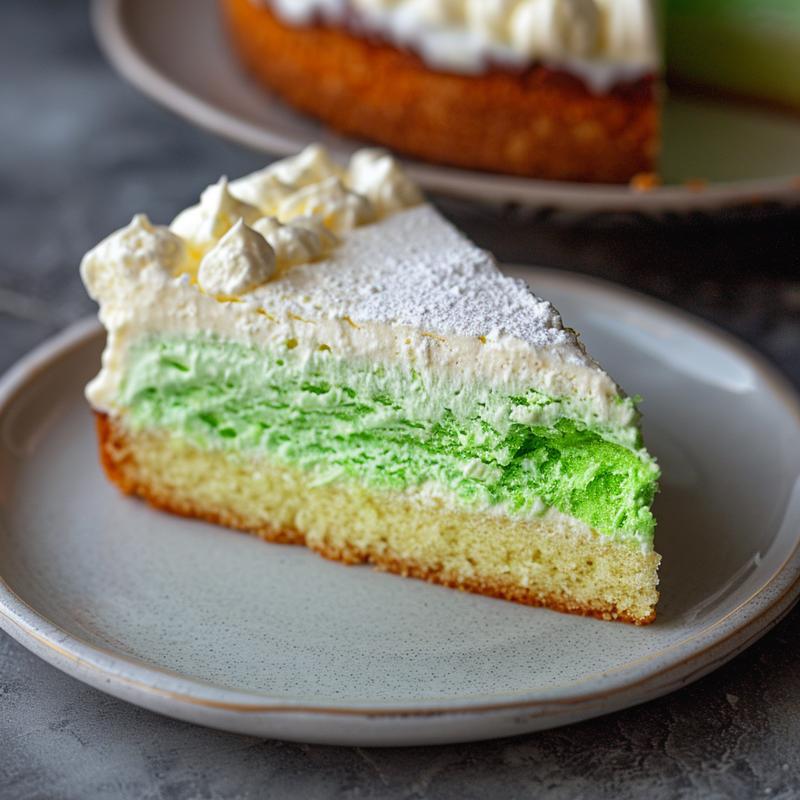
- Visually Stunning: The ombre green frosting and festive decorations make it a showstopper.
- Surprisingly Easy: While impressive, the recipe is straightforward and achievable for home bakers.
- Perfect for St. Patrick’s Day: The ultimate dessert for your S day celebration.
- Customizable: Easily adaptable to different dietary needs or flavor preferences.
I’ve found that the best recipes are those that can be adapted and personalized, so feel free to experiment and make this cake your own. If you’re looking for a show-stopping dessert that’s both delicious and meaningful, this Shamrock Shake Cake is the perfect choice.
The Ingredients: A Symphony of Flavors
Before we begin our culinary journey, let’s gather our ingredients. Each component plays a crucial role in creating the perfect balance of flavor and texture. Remember, the quality of your ingredients directly impacts the final result, so choose wisely and with intention. Here’s what you’ll need, Grams Cups is specified for your convenience:
- Flour (240 grams, 2 cups): Provides structure and body to the cake.
- Cornstarch (30 grams, 1/4 cup): Contributes to a tender crumb.
- Baking Powder (4 teaspoons): Leavens the cake, creating a light and airy texture.
- Kosher Salt (1 teaspoon): Enhances the flavors of the other ingredients.
- Sugar (350 grams, 1 3/4 cups): Adds sweetness and moisture.
- Egg Whites (5): Contribute to the cake’s structure and lightness.
- Vanilla Extract (1 teaspoon): Adds a touch of warmth and complexity.
- Milk (240 grams, 1 cup): Provides moisture and helps to bind the ingredients.
- Butter (160 grams, 1 1/2 sticks, 6 ounces, cut into cubes): Adds richness and flavor to the cake.
- Butter, Softened (270 grams, 2 1/2 sticks, 10 ounces): Forms the base of the buttercream frosting.
- Table Salt (1/2 teaspoon): Balances the sweetness of the frosting.
- Powdered Sugar (460 grams, 4 cups): Sweetens and thickens the frosting.
- Cream (30-60 grams, 2-4 tablespoons, as needed): Adjusts the consistency of the frosting.
- Mint Extract or Oil (1 teaspoon): Provides the signature minty flavor.
- Green Food Coloring: Creates the iconic Shamrock Shake color.
- White Chocolate: For the decorative drip.
- Maraschino Cherries: A classic topping.
- Gold Luster Stars: Adds a touch of sparkle and whimsy.
Crafting the Shamrock Shake Cake: A Step-by-Step Guide
Now, let’s embark on the process of creating this delightful cake. Remember to approach each step with patience and care, allowing yourself to fully immerse in the art of baking. I’ll be guiding you through each step.
- Prepare the Oven and Pans: Preheat your oven to 350 degrees F (175 degrees C). Grease and flour three 6-inch round cake pans. This will ensure that the cakes release easily after baking.
- Melt the Butter: Place the cubed butter in a microwave-safe bowl and microwave for 30 to 45 seconds, until very slightly melted and soft. Be careful not to overheat the butter, as this can affect the texture of the cake.
- Combine Dry Ingredients: In the bowl of a stand mixer, combine the flour, cornstarch, baking powder, salt, and sugar. Mix on low speed until well combined.
- Whisk Wet Ingredients: In a separate measuring cup, whisk together the milk, vanilla extract, and egg whites until smooth.
- Incorporate Butter: With the mixer running on low speed, gradually add the melted butter to the flour mixture, a few tablespoons at a time. Allow the mixer to run for about a minute, until the batter is coarse and sandy and no visible pieces of butter remain. This is a crucial step, as it ensures that the butter is evenly distributed throughout the batter.
- Add Wet Ingredients: With the mixer running on low speed, slowly pour in the milk and egg mixture. Increase the speed to high and beat for 1 minute until the batter is homogeneous and smooth. Do not overmix the batter, as this can result in a tough cake.
- Divide the Batter: Divide the batter evenly among the prepared cake pans.
- Bake the Cakes: Bake for 16-20 minutes, or until a wooden skewer inserted into the center of the cakes comes out with only a few moist crumbs.
- Cool Completely: Allow the cakes to cool in the pans for 10 minutes before inverting them onto a wire rack to cool completely.
- Prepare the Frosting: In the bowl of a stand mixer, beat the softened butter for 3 minutes, until light, fluffy, and doubled in volume. This is the key to a smooth and creamy frosting.
- Add Salt and Sugar: Gradually add the salt and powdered sugar to the butter, mixing on low speed until combined. If the frosting is too thick, add cream slowly, a spoonful at a time, mixing after each addition.
- Add Mint Extract: Stir in the mint extract until well combined.
- Color the Frosting: Divide the frosting into two bowls. Add a few drops of green food coloring to one of the bowls and mix until you achieve the desired shade of green.
Assembling and Decorating: The Art of Presentation
Now comes the fun part: assembling and decorating your Shamrock Shake Cake. This is where you can truly let your creativity shine. The cake is delicious if you eat it plain, but I’m here to show you how to make it even more impressive!
- Layer the Cake: Place one cake layer on a cake stand or serving plate. Top with 1/2 cup of frosting.
- Repeat: Repeat with the remaining cake layers and frosting.
- Create the Ombre Effect: Working with just the green frosting, apply a thick layer to the bottom half of the cake. Repeat with the white frosting for the upper half of the cake, saving 1/2 cup for later.
- Blend the Frosting: Use a large spatula to gently blend and smooth the frostings together, creating a seamless ombre effect.
- Chill the Cake: Place the cake in the refrigerator to chill for at least 30 minutes. This will help to set the frosting and make it easier to decorate.
- Drip with White Chocolate: Gently melt the white chocolate in the microwave. Pour or pipe the melted chocolate over the edges of the chilled cake, allowing it to drip down the sides.
- Pipe Poofs: Using the reserved white frosting, pipe some poofs on top of the cake with a French tip or star tip.
- Add Cherries and Stars: Place a maraschino cherry on top of each poof and sprinkle with edible gold luster stars.
Pro Tips for the Perfect Shamrock Shake Cake
- Use Room Temperature Ingredients: This helps the ingredients to emulsify properly, resulting in a smoother batter and a more even bake.
- Measure Accurately: Baking is a science, so it’s important to measure your ingredients accurately. Use a kitchen scale for the best results.
- Don’t Overmix the Batter: Overmixing can develop the gluten in the flour, resulting in a tough cake.
- Cool the Cakes Completely: Frosting warm cakes can cause the frosting to melt and slide off.
- Chill the Cake Before Decorating: This will help to set the frosting and make it easier to decorate.
These little tips can make a big difference in the final outcome of your cake. Remember, baking is a journey, not a destination, so don’t be afraid to experiment and learn along the way. I’m sure you’ll be great!
Common Mistakes to Avoid
- Overbaking the Cakes: This can result in a dry and crumbly cake.
- Using Cold Butter for the Frosting: This can make the frosting difficult to beat and result in a lumpy texture.
- Adding Too Much Mint Extract: A little goes a long way, so start with a small amount and add more to taste.
- Not Chilling the Cake Before Decorating: This can make the frosting difficult to work with and result in a messy finish.
Variations: Adding Your Personal Touch
- Shamrock Shake Cheesecake: Incorporate a layer of cheesecake filling between the cake layers for an extra decadent treat.
- St. Patrick’s Ombre Cake: Create a more dramatic ombre effect by using different shades of green food coloring.
- Irish Poke Cake St. Patrick’s Day: Poke holes in the baked cake and pour a mixture of Irish cream liqueur and sweetened condensed milk over the top.
- Irish Cream Poke Cake St. Patrick’s Day: Add Irish cream liqueur to the frosting for an extra boozy kick.
- Mint Shake: Use a different type of mint extract or oil for a unique flavor profile.
Feel free to experiment with different variations to create a cake that is truly your own. The possibilities are endless!
Storing Your Shamrock Shake Cake
To keep your cake fresh, store it in an airtight container in the refrigerator for up to 3 days. You can also freeze the cake for up to 2 months. Thaw it overnight in the refrigerator before serving.
Frequently Asked Questions
- Can I use a different size cake pan? Yes, but you may need to adjust the baking time accordingly.
- Can I make this cake ahead of time? Yes, you can bake the cakes and make the frosting ahead of time. Store them separately in the refrigerator until you are ready to assemble the cake.
- Can I use a different type of milk? Yes, you can use any type of milk that you prefer.
Serving Suggestions
Serve your Shamrock Shake Cake chilled. It’s delicious on its own, but you can also serve it with a scoop of vanilla ice cream or a dollop of whipped cream. A cherry on top is always a welcome addition! This cake is perfect for St. Patrick’s Day celebrations, birthday parties, or any occasion that calls for a festive and delicious dessert. I ll be making this cake on Friday for my family!
Remember, this recipe is more than just a set of instructions; it’s a connection to the past, a celebration of tradition, and a way to create lasting memories with loved ones. I hope you enjoy making and sharing this Shamrock Shake Cake as much as I do. And then, you will have a beautiful and delicious cake to share with family and friends. If you follow these steps, the cake will be a success. It’s a testament to the power of food to bring us together, to transport us to another time and place, and to nourish both our bodies and our souls. So, go ahead, bake this cake, and let it be a symbol of joy, hope, and the enduring spirit of St. Patrick’s Day.


Shamrock Shake Cake
Ingredients
Method
- Preheat oven to 350 degrees F and grease and flour 3 6-inch round pans.
- Microwave butter until slightly melted.
- Mix flour, cornstarch, baking powder, salt, and sugar.
- Whisk milk, vanilla extract, and egg whites.
- Add melty butter to flour mixture gradually.
- Stream in milk and egg mixture; beat until smooth.
- Divide into prepared pans.
- Bake for 16-20 minutes.
- Allow to cool completely.
- Beat softened butter until fluffy.
- Add salt and sugar; add cream if needed.
- Add the mint extract.
- Divide batter; add green food coloring to one bowl.
- Place layer on stand; top with frosting.
- Repeat until all layers are stacked.
- Add green frosting to the bottom half.
- Add white frosting to the upper half.
- Blend and smooth the frostings together.
- Chill in the fridge.
- Melt white chocolate; pour over edges.
- Pipe poofs on top with extra white frosting.
- Place a cherry on each poof and add gold stars.
Notes
Loved this recipe? Save it to your favorite Pinterest board so you can easily find it later! ✨